PI Expert comes with a Component Library that contains Transformers (composed of Cores and Bobbins), Capacitors, Diodes, Zeners/TVSs, Inductors, Optocouplers, Heatsinks, Shunt Regulators, Thermistors, Fusible Resistors, Fuses, Silicon Controlled Rectifiers, Transistors and Varistors that are used when creating designs. The component library allows you to document the use of custom components in a design and use these components during optimization. You can expand the component library by adding components in addition to importing external component libraries. You can also export your component library and share it with others PI Expert users.
You cannot delete any of the default components in the library. Default components are components that are included in the library at the time of installation and have Default for their library type. You can use a Component Set to exclude them from use in designs. Additionally, before components newly added to the component library can be used in a design, they must be added to a component set unless you are using the All Records component set. See Component libraries and Sets Overview for more information. You can also refer to each component type help topic (Transformers, Capacitors, Diodes, Zeners/TVSs, Inductors, Optocouplers, Heatsinks, Shunt Regulators, Thermistors, Fusible Resistors, Fuses, Silicon Controlled Rectifiers, Transistors and Varistors) for additional information.
An example of how to use the component library (and component set) is included in the Component Libraries and Sets Overview.
To open and edit the Component Library:
Make sure to close any open designs. If you do not close all open designs, a warning message will be displayed. It is important to close all designs when modifying the component library because changes to the component library could affect the open designs.
From the main menu select Tools | Component Library
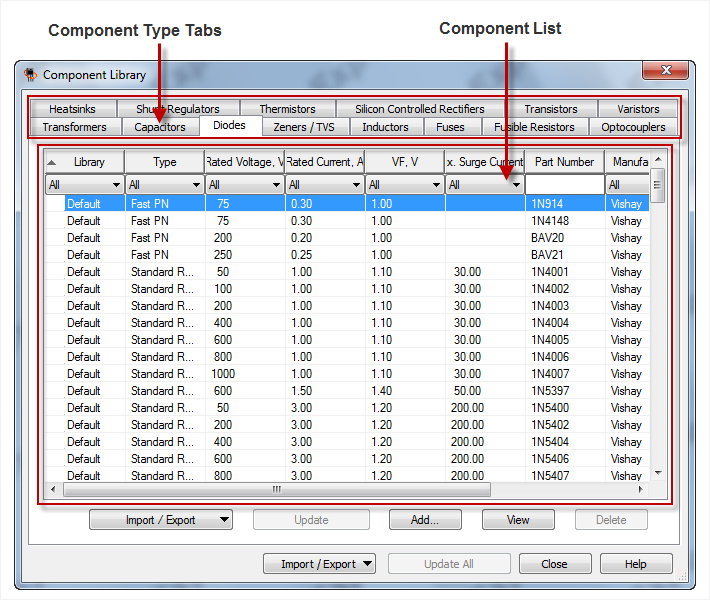
The component library dialog opens and has a tab for each component type in the library.
To add a component, click the Add button. The appropriate component type dialog box will appear for you to enter the component specifications. Please see the appropriate component type library help topic for more information on entering the specifications for Transformers, Capacitors, Diodes, Zeners/TVSs, Inductors, Optocouplers, Heatsinks, Shunt Regulators, Thermistors, Fusible Resistors, Fuses, Silicon Controlled Rectifiers, Transistors and Varistors. After adding all the components you want, select the Update Library button to update and save the component library. You may also click Update All Libraries to update all component type libraries. Using the Update All Library will close the Component Library dialog.
When adding a component, by default, the component type dialog box will contain the information of the component that was selected in the component list. Therefore, if you want to add a component that is very similar to one that already exists in the component library, you can select that component in the component list and click Add. The component type dialog will appear and contain the selected component's specifications. This makes minor modifications much easier.
You can modify only user added components. To modify a component:
Click the tab of the component type you wish to modify. To find the component you want to modify in the component list more quickly, use the Library column filter and filter by User (for more information see Sorting and Filtering the Component Library).
Click once on the row of the component you wish to modify and then click the Edit button. You can also double-click the component you want to edit.
The component type dialog opens (see Adding a Component).
Make the desired changes. Make sure to update the component library to save your changes.
If you want to modify one of the default components you must create a duplicate component and make the desired changes to this new user component. By default, PI Expert will change the manufacturer of this newly created component to make sure that the component is unique. If you want to keep the manufacturer the same, be sure to change the model number. Remember, to use this modified component you must include it in a Component Set if you are not using the All Records set.
As discussed in Modifying a Component, you can modify only user added components. However, you can view the component type dialog, that displays the specifications for a given component, by clicking the tab of the component type (transformers, capacitors, etc) that you wish to view. Select the component from the component list and click the View button. You can also double-click the component in the component list.
To delete a component from the component library:
Click the tab of the component type you want to delete (transformers, capacitors, etc.).
Select the component you want to delete from the component list and click Delete to remove the component from the library.
Only user components can be removed from the component library. Therefore, you can use the Library type filter to select User and then delete the components this way as discussed in Sorting and Filtering the Component Library.
Note: You can not delete default components. To remove a default component use Component Sets.
PI Expert supports custom component libraries when saving designs. This means that if you want to share a design that uses any of your custom components, you do not need to export all your libraries as well. All of the necessary component information is automatically included within the design file.
When you open a design containing any components that are not in your component library the following message is displayed:
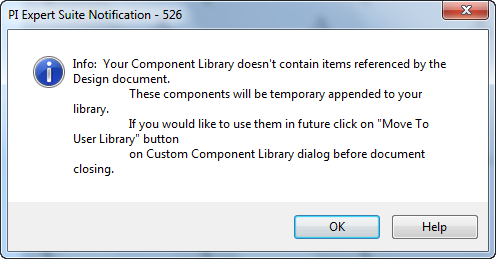
The missing components are stored temporarily in the component library and the design is opened using the custom components specified.
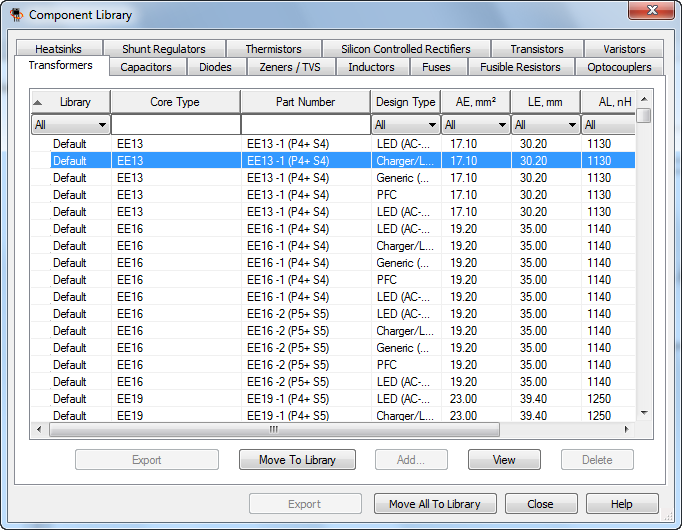
You can add the temporary components that are included in an opened and active design to your component library by using the Component Library dialog. You can make the design active by clicking on its window or selecting it from the Window menu. Open the Component Library dialog box but do not close the design.
Check to see what Temporary component types are used in the design by clicking on each tab of the Component Library dialog and using the Library type filter (as discussed in Sorting and Filtering the Component Library) to filter by Temporary as this greatly speeds up the process. Select the components you wish to add to your component library in the component list and click the Move To Library button.
The component is now stored in your Component Library and the component library has been updated. This component is now treated like any other user component and can be used in designs and during optimization through the use of a Component Set.
Each component list type (Transformers, Capacitors, etc.), has a number of sorting and filtering options available for each data column, which makes using the component library faster and more convenient.
You can sort each column in the component list by clicking on the top of the column. The arrow direction indicates that the column is being sorted in ascending (arrow facing upwards) or descending (arrow facing downwards) order. You can change the sort order by clicking on the top of column again.
You can also navigate the component list by using the Up and Down arrow keys in addition to the Page Up and Page Down keys to scroll through the component list.
Depending on the type of data present in each column, different filtering options are available. Cascading multiple filters helps you find the components that you are interested in quickly. You can cascade multiple filters, which is equivalent to having all of the filters joined with the AND logical conjunction, so that only the components that meet all of the filter criteria are displayed.
Columns that contain numerical values will display a drop-down box beneath their column title. You can select either All, which does not filter any of the components based on the data in this column or you can select Filter. Selecting the Filter option will present the Custom Filter dialog box and will display a filter Operation drop down box and a filter Value input box. There are three available operations that may be preformed on the input box value:
= Choosing the equal to (=) operation will filter and display only those components that have this data value equal to the Value in the input box.
<= Choosing the less than or equal to (<=) operation will filter and display only those components that have this data value less than or equal to the Value in the input box.
>= Choosing the greater than or equal to (>=) operation will filter and display only those components that have this data value greater than or equal to the Value in the input box.
Columns that contain type data (data that falls into broad categories; for example, diode types are: Fast PN, High Voltage etc.), will display a drop-down box beneath their title that contains all of the unique type values. Selecting one of the unique values displayed, shows components that are of the selected type only.
Columns that contain certain types of text data (for example, part numbers) display text entry boxes beneath their column titles. You can type the beginning letters of the string you want to filter for. Components that have strings with matching beginning letters to those entered are displayed in the component list.
Note: The text data filter is case sensitive.
Use the following example to understand the use of the sorting and filtering capabilities of the component library using the Diode Library:
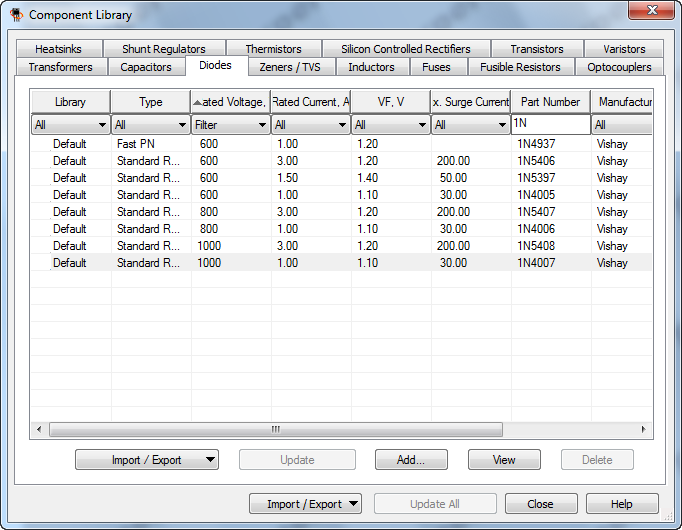
Task: Assume you want to view all "1N" series diodes that are standard recovery diodes and are rated above 600 V sorted in ascending voltage order.
Open the Component Library and click the Diodes component type tab.
In the text input box below the Part # column type: 1N. The component list now displays diodes only with part numbers beginning with 1N. This is an example of a Text Data filter.
Click the drop down box beneath the Type column and select Standard Recovery. This is an example of a Type Data filter. The component list now displays only the diodes that have a part numbers beginning with 1N and that are standard recovery type diodes.
Click the drop-down box beneath the V Rated column and select Filter.
In the Custom Filter dialog select >= (greater than or equal to) in the Operation drop down box and enter 600 into the Value input box and click OK. This is an example of a Numerical Data filter. The component list now displays only the diodes that have part numbers beginning with 1N and that are standard recovery type diodes and that are rated for a voltage greater than or equal to 600 V.
You can now sort the resulting list of diodes by clicking the V Rated column title until the arrow is pointed upwards, which indicates that the list of diodes is sorted in ascending order.
The screenshot below shows the results of all the filtering and sorting preformed in this example:
You can share component libraries with other PI Expert users through the use of the import and export feature. Each type of component (Transformers, Capacitors, etc) must be exported or imported separately. For example, to export all of the custom components you have added, you must click each component type tab and export each component type into their own *.pilib file. This is also true when importing component libraries. Therefore, you must be viewing the component type you wish to import or export. Therefore, it is useful to include the component type that has been exported in the filename when exporting component libraries.
Remember:
Use the Import/Export button to select between importing or exporting a component library.
Component Library files have the .pilib extension.